
Advent of Cyber 2025 – Day 3 Walkthrough
Today’s challenge presents a short introduction to Splunk – one of the most popular SIEM solutions in enterprises today and is used in Security Operations Centers all over the world! In this challenge, we’ll dive right in and get hands-on with Splunk.
One of the great things about Splunk is the huge abundance of free training that’s out there. Splunk also has its own certifications including the Splunk Certified Cybersecurity Defense Analyst, and an annual event called Boss of the SOC.
In this walkthrough, I took a different track than the writeup/walkthrough provided by TryHackMe. Since they already walk you through every step, I didn’t think there was much value in repeating it. Instead, I looked at each question and tried to use the simplest means possible for finding the solution.
I also thought that – while TryHackMe does a great job in teaching you some basic search queries, the path that they show was unnecessarily complex, especially since our goal is answering the questions and getting an idea of the overall attack chain. So I tried to keep my walkthrough as simple as possible, using Splunk’s built-in options for running queries and reports. Every time you drill down (for example, by selecting an IP address or path), Splunk will adjust the search query for you – this feature is incredibly useful and you can quickly customize your search query further as you investigate.
Hopefully this walkthrough will provide additional value to that provided by TryHackMe, especially for those who are just getting started.
Question 1
What is the attacker IP found attacking and compromising the web server?
Splunk does a great job of providing a visual timeline right on the main dashboard, and provides lots of helpful ways to drill down into the data.
To get started, after using the search term ‘index=main’ to search for all available logs over all of time, I used the client_ip field to very quickly look at the relevant IP addresses. It turns out that almost 50% of the events with this field were linked with a single IP address. This of course, bears more investigation.
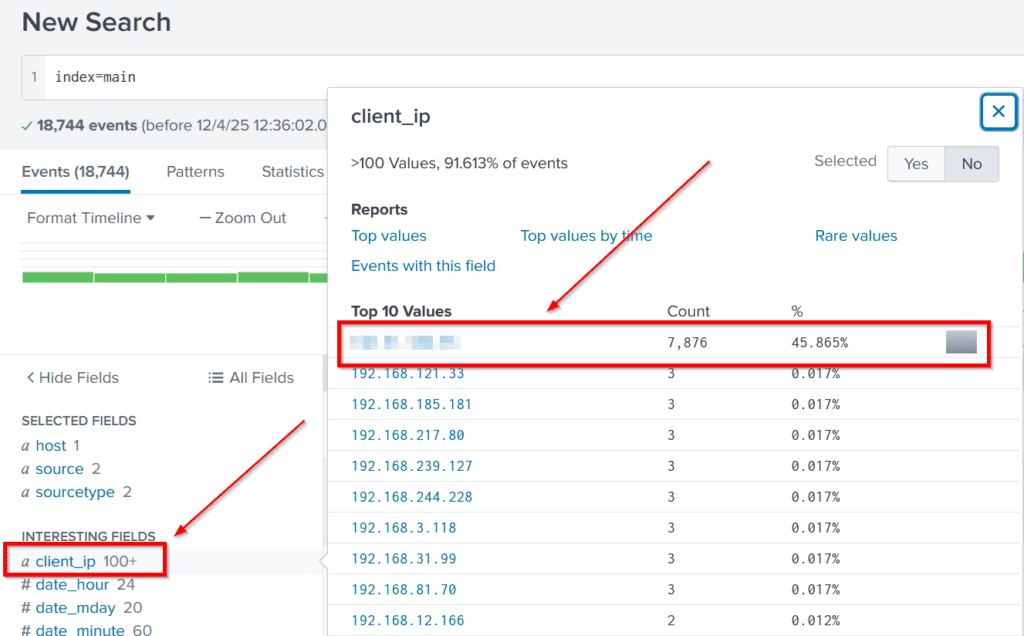
Answer Hint:
Use the client_ip field to quickly drill down and discover a suspicious IP address.
Question 2
Which day was the peak traffic in the logs? (Format: YYYY-MM-DD)
One of the most powerful ways to reduce background noise in an investigation is to start trying to determine a timeline. When you begin an investigation you won’t know the entire timeline (that’s part of the goal of the investigation), but the quicker we can identify a point in time linked with the attack chain we’re investigating, the faster we’ll be able to start making real progress.
To answer this question, we don’t even need to perform any additional action because Splunk by default (given the timeline of our data) should display the number of events per day right on the dashboard. We can clearly see a large increase in the number of events over a 5 day period, with the third day having the most events. You can hover over each day to find out exactly how many event logs we have per day.

Answer Hint:
Simply look at the timeline on the main dashboard and hover over or click on the column with the highest number of events.
Question 3
What is the count of Havij user_agent events found in the logs?
I used the ‘user_agent’ field to find out the event counts for all users:
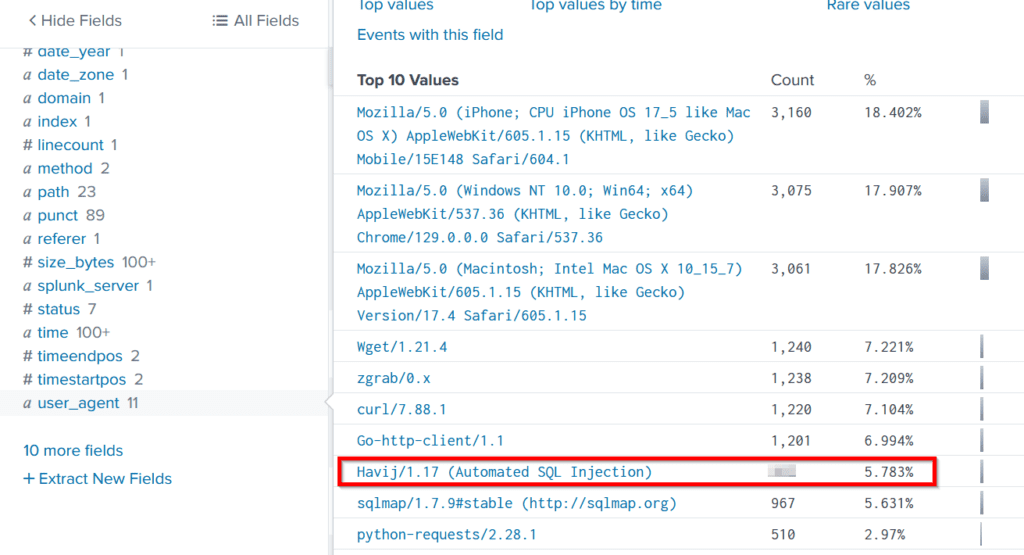
Between Havij and sqlmap, we can immediately tell that the attacker was attempting to identify a SQL injection vulnerability. SQLi is one of the most common web app vulnerabilities, and can be used to dump the database contents or even gain remote code execution (RCE).
The attacker’s use of the default user agent is quite sloppy! The user-agent parameter is set by the application making the http request, and can be set to any value. It’s easy to set this to a value that would have been more difficult to spot. This indicates that the attacker is unlikely to be sophisticated.
Answer Hint:
Use the user_agent field to view the relevant data.
Question 4
How many path traversal attempts to access sensitive files on the server were observed?
We observed that the attacker attempted SQL injection. This involves trying a number of different payloads which (for SQLi) come in the form of various URL paths.
A next logical step would be to investigate specifically what payloads were attempted using the ‘path’ field. When we do this, we can also see an attempt at path traversal using the ‘file’ parameter to perform a file inclusion attack:
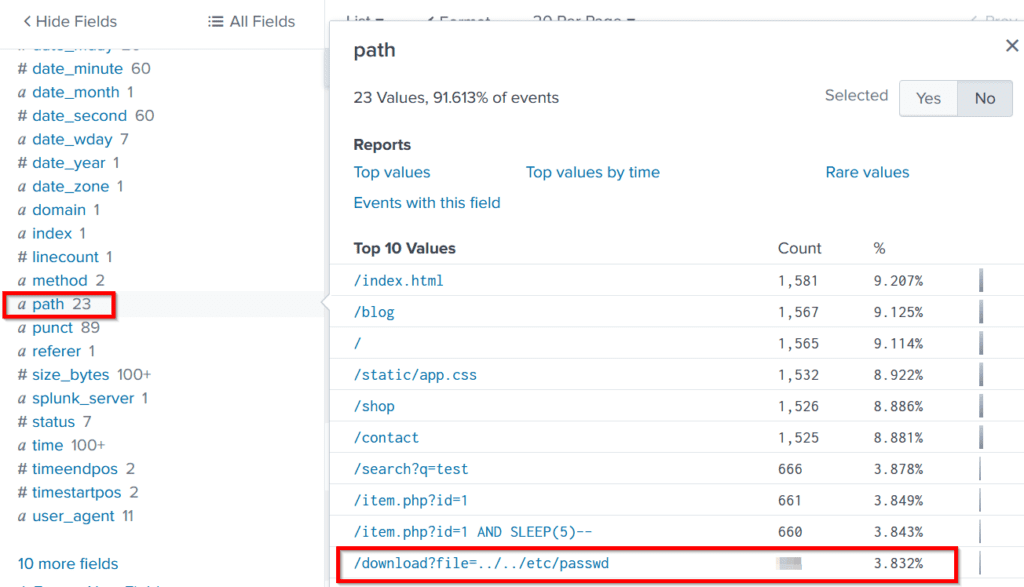
As the walkthrough by TryHackMe notes, path traversals often use the ‘../’ character combination, as this instructs the target machine to go up one directory.
Since attackers don’t know what directory the web application operates out of, the best case is to try multiple ‘../’ character combinations, like ‘../../../../’. This is really just the start – as this character combination is often blacklisted, attackers may try combinations like ‘….//….//’ or URL encoding the payload.
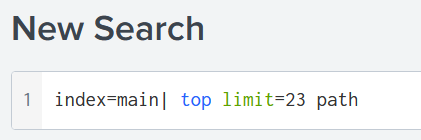
Since I didn’t know if this was the only path traversal payload attempted, I ran a report for the ‘path’ field to see the Top Values. We can see that there are only 23 total values, so I knew it would be quick to glance through it and find any other attempts at path traversal:
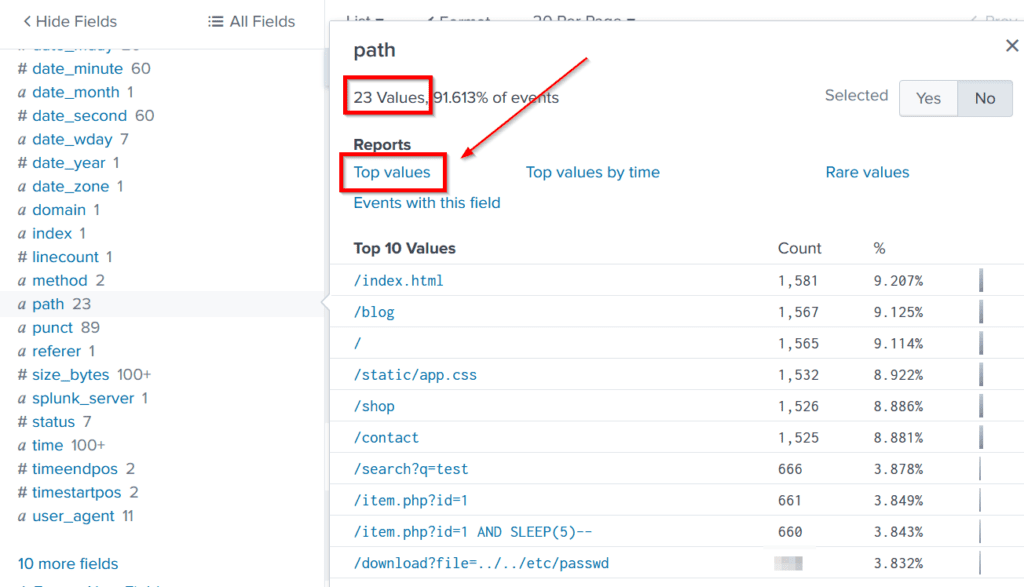
After running the report, I changed the search command to ’23’ so that I would capture everything:
There’s a lot going on here! I’ve taken some quick notes on this image to demonstrate things that you should be looking for.
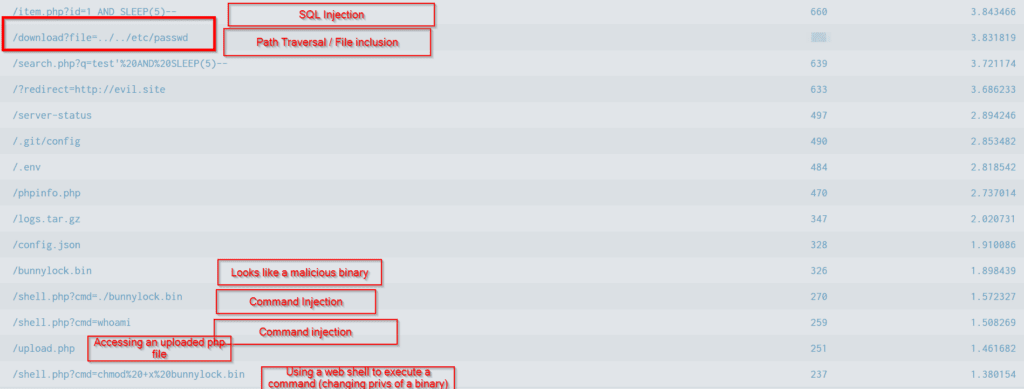
Each of these are threads that we would need to tug on to perform a thorough investigation.
Answer Hint:
Look for the event count corresponding with the path traversal and file inclusion attack.
Question 5
Examine the firewall logs. How many bytes were transferred to the C2 server IP from the compromised web server?
Now that we’re firmly on the trail, I searched for ‘bunnylock.bin’ and looked at the ‘client_ip’ field to get my attacker’s IP address.
Noting that this IP address would correspond with the ‘dest_ip’ field in the firewall logs, I ran the following search:
index=main dest_ip="<redacted>"
| stats sum(bytes_transferred)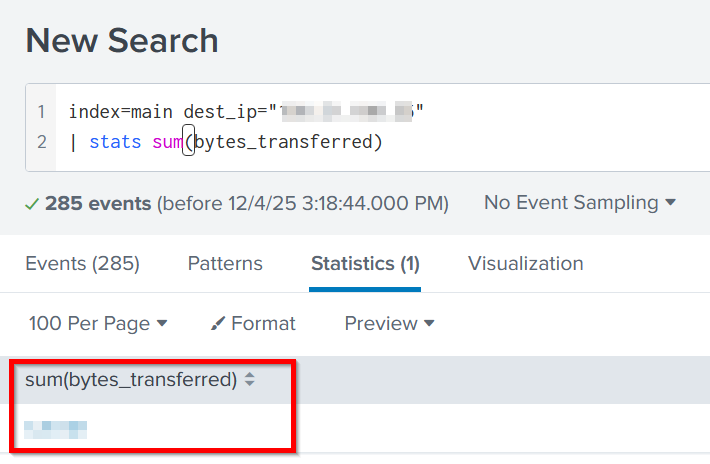
Answer Hint:
First identify the attacker’s IP address (there are many ways to do this!) Then run the above search.